Showing posts with label CAS. Show all posts

Friday, January 10, 2020

Rubber Crimbo Duckie

First post in a while that isn't a catch-up post! It's a DT day post! And I wanted to re-purpose the Rubber Duckie digistamp from Dr.Digi's House of Stamps and use him for a Christmas card. I really need to work on my Christmas card stash all year round and not leave them til December! lol.
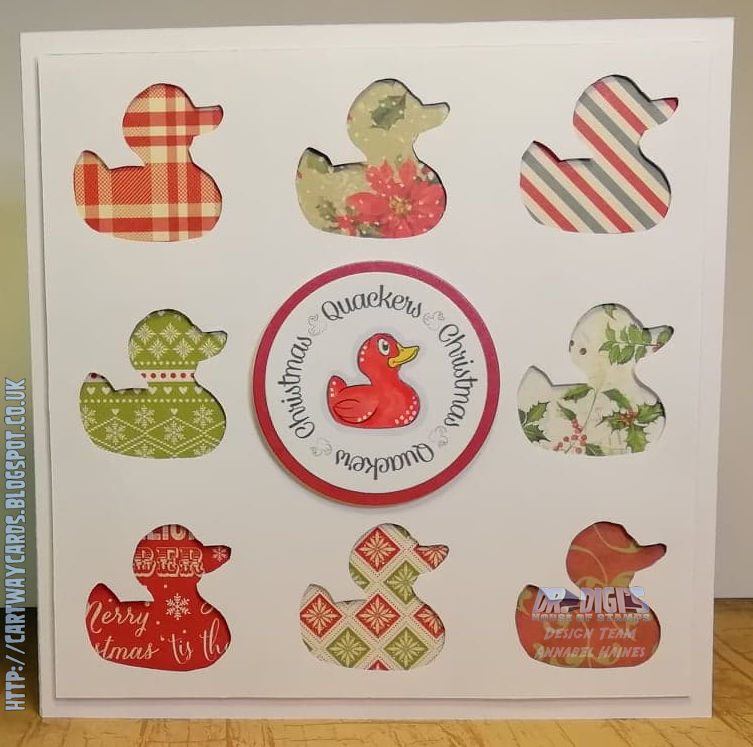

This is a super simple card using the Rubber Duckie digi, it could be even more CAS than I did it but I wanted to share with you how easy it is to use a nicely shaped digi to make a card like this for any occassion. It's always great for using small scraps of cool papers too!


This is what the digi looks like when you download it -


Here are some brief instructions of how I made it.

First of all I create a 16x16cm square on the computer and used an overlay grid to position the ducks. My grid overlay divided the square into a 3x3 grid and I positioned a duck centrally in each section. For the middle section I pasted a small duck and added a circular "Christmas Quackers" greeting. I then printed this out and cut out the eight outer ducks (making duck shaped holes/windows). 

(The red lines here are not my grid, they are to protect the digi from theft.)


(If I then only kept the shape around the ducks, leaving just silhouettes it would be very simple to create an svg file and cut it out on the cutting machine!)

I then created a grey box to cover each of the ducks and pasted it into the grid I had made. This is for the correct layout of the scrap papers underneath my ducks.


I then added some extra border to the square making it a 17x17cm card front for the card. By adding a black border on 3 sides I was able to cut it out the right size and score the 4th edge ready to make up my card. (I leave a 2 centimetre overlap and then stick it onto another blank 17x17 cm square to make the card blank).

After I had printed this out I cut out eight 4.5x4.5cm squares from christmas papers. I stuck them on each of the grey squares. 

Using 3D foam I mounted the topper, with the duck shape windows directly on top of the papered squares.


I cropped out the sentiment design and reprinted it on a new sheet of paper, and then using my cuttlebug and dies made it into a 5cm diameter circle and from red card a 5.5cm diameter circle to layer it onto. 


I then coloured in the duck with copics and 3D foamed it into the centre of my card.


Finished Card!


Did you like a post with more instructions and info on how I made it? Tbh, with my coloured cards the process is very obvious and simple but I thought maybe when I use the computer to make a card or a template for lots of cards, it might be interesting and helpful to share?


Thursday, October 11, 2018

Zombie Hugs

I thought I would make a bit of a CAS card for my second Witt & Sass slot this week. I have used the bloody pools, arms and a fab sentiment from the new Zombie Pets Set!


I created it twice in case I messed up the copic colouring, but as it was so nice to colour, and the colouring went quite well, I ended up making two! I rounded off the corners and mounted the toppers on backing papers from the Chalk Studio Basics 6x6 from My Mind's Eye.


I also added a spot of bling with some "Fun Fair" enamel dots from Trimcraft. Some of my creepy props may have been harmed in the making of this photoshoot due to me eating them, lol. 


Nice to have a stamp set than gives you ideas for something simple and effective to make, that's also pretty speedy! Hope it inspires you too!


Monday, September 24, 2018

Car-card!

Popping in with a car quickie! Made this CAS Car Card (hard to say when you're drunk!) for my brother who has had a new car. My Mum passed me the details, I asked for some deets so I could add  some accuracy to the car and she told me... it's blue! The full technical response, lol! 


So I found a free clip art car, printed it out and coloured it with copics (and a white posca pen), then cut it out. I printed out a banner in Mister Sirloin font. I did some watercolour blobbing directly onto a 7x5 card blank (with Gansai Tambi Watercolours). I fussy cut out the car windows and popped a mirrored style paper behind. Then I assembled. Job done. Made two, cos, why not? 

Thursday, August 17, 2017

Thinking of You.

I kinda like to use up "spares" if possible, and after the last set of Sympathy/thank you cards I made, I had some spare cats!


The cat die I used is "Leabilities Cats", and I had previous created the watercolour paper they were cut from using my Gansai Tambi Watercolours. The frame was made by scanning in a large sheet of watercoloured paper and then using it in Paint Shop Pro to create a border.
The flower jar was a magazine freebie stamp that I coloured up with copics and added stickles and glossy accents. Pretty much a CAS card I think?

Wednesday, March 01, 2017

Challenge 34

Back again with another Crafty Addicts Challenge Blog post and this time it's for Challenge 34 - ATG/CAS (Anything Goes/Clean and Simple).

We are very lucky to have Polkadoodles sponsoring this month and offering a prize of £6.75, which equates to 3 digistamps from their shop.

I have chosen for my inspiraition card  "Winnie Wonderland - I'm late" featuring a very hurried white rabbit!


I have, as normal, used polychromo pencils on kraft card. I added some sequin bling from the stash and the sentiment is in the font called "Angelina".

Here he is a bit closer - 


We are also running a challenge in our facebook group this month, with a great prize from Dr.Digi's House of Stamps. Pop by The Crafty Addicts on facebook for a look at the DT inspiration and details on how to take part. I'll do a second post today with more deets too.

Sponsor Badge

http://www.polkadoodles.co.uk/


Wednesday, August 24, 2016

Messing with CAS techniques - final part!

The fourth card I made the other day at my friend Helen's house! We did plenty of messing, based on some of the fun on-trend techniques people are using in CAS (Clean and Simple) cards. So another watercolour background and Zig pens to colour in this fab seahorse from Prettygrafikdesign.


Background: Gansai Tambi Watercolour Paints.
Seahorse coloured with: Zig Clean Color Real Brush Pens
Main image: Digistamp from Prettygrafikdesign
On Vellum: Greeting from Chocolate Baroque - Happy Words and Birds Sentiments.  Stamped using a Misti! (It rocks!)

Monday, August 22, 2016

Messing with CAS techniques Part 3

This is the third card I made at my friend Helen's house the other day, using some of the on-trend techniques used in CAS (Clean and Simple) cards. Also using some of her delicious new crafty purchases!

Watercolour background, matted and layered onto purple card stock (but it would be just as easy to do it one layer styley instead) and 3D foam mounted penguin on top. Added stamped greeting on vellum (Using a Misti - which is awesome!) and sequins from the stash!


Background: Gansai Tambi Watercolour Paints.
Penguin coloured with: Zig Clean Color Real Brush Pens
Main image: Digistamp from Prettygrafikdesign
On Vellum: Greeting from Chocolate Baroque - Happy Words and Birds Sentiments.
Added White posca pen snow spots after!

Close up detail.

Friday, August 19, 2016

Messing with CAS techniques Part 2

Next card using some of the techniques I am liking from the current CAS (Clean and Simple) trend. Also trip to my friend Helen's meant having some new crafting goodies to play with.

This is a watercolour background, matted and layered onto cardstock, with vellum greeting and 3d foam mounted lion.


Background: Gansai Tambi Watercolour Paints.
Lion coloured with: Zig Clean Color Real Brush Pens
Main image: Digistamp from Prettygrafikdesign
On Vellum: Stazon Black Ink and Greeting from Hero Arts - Messages with flourish CL738

Monday, August 15, 2016

Messing with things!

Been really inspired to have a go at some of the techniques used on the current trend of CAS (Clean and Simple) cards. Also went to my friend Helen's who has some of the latest crafty goodies to play with. Made four cards in our messing session and this is the first. (Will blog all of them eventually!)

So this is a watercolour background (Could be done one layer but I used watercolour paper and matted/layered it) with a cute animal digi, greeting stamped onto vellum and sequin embellis!


Background: Gansai Tambi Watercolour Paints.
Fox coloured with: Zig Clean Color Real Brush Pens
Main image: Digistamp from Prettygrafikdesign
On Vellum: Stazon Black Ink and Greeting from Hero Arts - Messages with flourish CL738