Showing posts with label colouring. Show all posts

Monday, January 14, 2019

Not long to catnap....

Hi again! Got lots of Knitty Kitty things to share with you today, thought I would write up a blog post covering as much as possible in synopsis, including the new Knitty Kitty Digi Catnap digistamp (that was a Facebook Group freebie before Xmas).


So to start with, three sponsoring news stories! 

I am very happy to be the featured digi artist in the current edition of Through the Craft Room Door.  The TTCRD DT and the KKD DT have done some amazing projects for it! If you subscribe to the mag you get the full inspo collection but some of the DT members have posted their cards in the KKD Facebook Group too!

If you subscribe to the magazine you will get two free Knitty Kitty Digis! They are only free to subscribers.


Through the Craft Room Door is a bi-monthly publication dedicated to bringing you exciting projects to inspire your card making and scrap book endeavors! In addition to articles, product reviews and kid friendly crafts, each issue introduces new or well known digi artists and their works. If you are interested in a subscription, details can be found on the website.

This issue's front cover:


Second sponsoring news! 

Knitty Kitty Digis is also sponsoring at The Crafty Addicts Challenge Blog this month. Their DT have made some super projects using KKD stamps! If you would like to take part, just attach one of you projects to the Challenge Post! There is a prize of 3 KKD images!


Third sponsoring news!

Knitty Kitties are also sponsoring The Outlawz Twisted Thursday Challenge!  Very happy that their DT will be posting lots of super projects in the Knitty Kitty facebook group this month. Have you ever been and explored the Outlawz challenges? So much going on there and a really active and supportive crafty social group! 


And Finally the Card!

Right, and finally today I want to share with you the card I have made using the "Catnap" digistamp from Knitty Kitty Digis


As normal this is polychromo pencils on kraft card. I print the image and greeting directly onto a smooth kraft card. I make the digi image pale so I can go over the lines when I colour the fur. (Link to my fur colouring step by step photos -->  here.)


I added a tiny spot of white posca pen to the eyes and nose. Background papers from the stash and bling stars are from Paperchase. Font is Angelina.


Thanks very for making it to the bottom of this very long post! Nice to have so much Knitty Kitty related content to share with you today! I have some new stamps to share soon too! 


Friday, June 01, 2018

Mycroft and Watson

Dr.Digi Friday folks, second post today, both DT's have for just one day, aligned! I am here to share with you the fabulous Mycroft and Watson.


Really enjoyed colouring this up, though I did slightly regret opting for a woven dog bed, about thirty minutes into colouring it, lol!


I added a sentiment directly to the digi before printing it out and colouring it in. Font is Bernadette Rough. Just finished it off by 3D foaming it onto the card blank and backing paper, and then some corner bling to finish. Glossy accents on the noses HAD to be done.


Here is the digi in the shop if you are interested in taking a look and maybe purchasing?
Click on the badge below to check out the Dr.Digi Facebook Group! Helpful if you want to keep an eye out for special offers and comps!


Final Shot of the card, cos I took far more photos than were strictly necessary! :D


Monday, October 30, 2017

New digi in the shop Me Hearties!

I've been working on ideas for a Furry Tails set for quite a while and am happy to finally get one in the shop to share with you! Here is "Cat'lin Sparrow" (Thank you Laine for the name!)

(He's actually ATC sized in this coloured image!)

 I coloured him with polychromo pencils on kraft card.

And here he is in digi format! Now available in the Etsy shop for $2.

https://www.etsy.com/uk/listing/553494786/digi-stamp-instant-download-catlin?ref=shop_home_active_1

Feel free to pop by the Knitty Kitty Facebook Group Page to see awesome images by the KKD Design Team who have been colouring him up a treat!

https://www.facebook.com/groups/KnittyKittyDigis/

Sunday, October 08, 2017

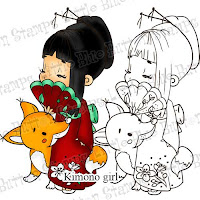
Kimono Girl by LBBS

Back again with another cross post from here to the Little Blue Button Stamps Blog. More adulting! :D

I'm loving being on the Little Blue Button DT, so many awesome images to pick from. This time I went with Kimono Girl. I am particularly partial to any fabulous fox digi, and this has additional cuteness too!


I love this quote from Pinterest and thought something "friendy" was perfect for this sweet image. I coloured her with polychromo pencils on kraft card. She was really lovely to colour, particularly her awesome hair, lots of space to work on your hair colouring techniques! The font I used is called Bernadette Rough.


I added some Stickles sparkle to her dress and some Nuvo Jewel Drops to the fox's nose. I also popped on some Wink of Stella to the fan, which shows up nicely in real life.

Click the picture below to check her out in the shop!

http://lbbstamps.com/product/kimono-girl-digital-stamp-cardmaking/

 To finish I mounted the topper onto a 7x5 card blank and added some red pearls from the stash.


Can't wait to get colouring on the next image, I think I might be a bit addicted to colouring LBB Stamps!


Tuesday, September 12, 2017

Colouring Tutorial for Fur using Polychromo Pencils on Kraft.

This was requested and suggested by crafty friends who would like to know how I colour fur when I use pencils on kraft card. Here is the card I made and took pictures of to show the process!


I am not a professional colourist, and do not want to replace great colouring tutorials available on line, but this is showing you my way of colouring, to hopefully give you some ideas!

So details to start with.

  • I have the standard 24 box of polychromo pencils + a few extras.
  • I always use my pencils with a sharp tip.
  • I also use a fine nibbed White Posca Paint Pen and a Uni Pin Fine Line Black Pen.
  • I am using card called Kendal Buff. It is a light smoothish kraft card.
  • I am using the image "Grumpy Bunny" from Knitty Kitty Digis Snow Scene Set Quartet.
  • I am aiming for a grey bunny!
  • I have printed him off in grey, so I can more easily colour over the lines and give him a furry look. On the same A4 sheet of card I also print off the digi in black so I can refer to it as I colour, and as gradually the image gets harder to see.


You can use other kinds of pencils. I have used the same technique with Spectrum Noir Pencils and it works OK! However it is much harder to use white over the top of other colours once the card becomes saturated using SN's. It's pretty easy with Polychromos to keep adding more layers. It was easier with Spectrum Noir Pencils to achieve a fine point on the pencil and do much finer fur, so there are advantages! I prefer polychromo's tho, for fur.

You can use other kinds of card too! I have used lots of kinds of kraft card. One of the standard card packs ,containing kraft card, has a different finish on either side. One side is actually pretty coarse. You can use the coarse side if you want, but the result is far softer and more pastel-ly looking. If the card is too smooth and shiny, it's hard to add more than a couple of layers of colour, so you might want to have an experiment with different varieties of kraft before commiting to a large pack of one type! :)


So, here goes. ( I ignore the tail to right at the end, no reason, I just forgot to include it earlier! lol)


1. I began by colouring all the non-fur elements. I am not planning on explaining how to colour hats and scarves, I am sure you can already do that! The only important point is to follow the same light source you used with your other elements when you start the fur. I have done the hat and scarf first because when I add the hair, they will be behind it. Light source is coming down from the top left. I have also done a white base layer to the areas of fur that will be pale, or have the most highlight. I also coloured the nose and inner ear with white, flesh and pink.


2. Because I am aiming for a grey bunny, and my shades will go from White to Grey to Black, I am using white to begin with. Along the far edge of every part of the bunny I add a layer of white fur. This is the furthest layer of fur in each area, the bottom most layer. (Keep your tip sharp!) So the lowest part of the foot, the edges of his belly, the underside of his arms etc. Try and follow the flow of how real fur grows on animals. Grab your nearest animal and have a look. For example, hair on the nose grows upwards, not downwards etc. If you are doing another coloured animal, you could also start with white or the palest tone/colour of the fur. Starting with white often works best on kraft card.


3. Then in rows, build up layers of individual hairs until the whole bunny is covered. Keep with the direction the hair grows, so over the belly here, I have done, four rows or white hairs, downwards. So the narrowest part of the hair is the last part of your stroke, so your strokes match the direction the hair grows. Because I have printed him in grey, I can ignore the digi outline a little and add in some hairs over the line to make him look more furry.


4. Using pale grey and then medium grey add a layer of hairs, just the same as with the white, everywhere apart from places you would like to catch the light, or remain white. Here I have left his belly, cheeks and arm highlights etc. If you are doing a creature with stripes, this is the time to add them in. Remember to keep with the flow of the hair you have already put down and use a range of lighter to darker tones in the stripe colour.
I also added in some darker hairs inside the ear, with a few upwards strokes.


5. Now with black, or your darkest shade, do a layer of hair everywhere there will be more shade, so under the scarf, belly, arms etc. Just one layer, following the flow of the hair, and over the top of the fur you have already done (in grey and white). I also added some darker hair where his eye will be to add some definition to his face. It makes more sense when you put his eye back in!


6. Add in a few fur strokes in darker colours (grey/black) to the paler areas to create some definition of a few hairs (see belly area/nose). Also add in extra white strokes to darker areas if they look too unintentionally stripy or dense.

Add hairs to the outline in dark or white depending on how well defined the edge is. If it's already well defined perhaps add more white, if less so, add some dark. I have also done this over the white area of his hat, adding some dark lines to show the fur is in front of the fluffy white rim.

On the feet, reverse the stroke process. Hold you pencil on the bottom line of the foot and do a short stroke upwards into the white hairs. This creates a sharp line at the base of the foot, darker than the hair, without interrupting the feel of the fur direction.


7. When I print out my image to colour, I also print, on the same sheet of card, a black image of the digistamp I am using so I can refer back to it at the later stages of colouring. As I have completely lost the eye and whiskers marks now, I put them back in with a black Uni Pin Fine Line pen. Wait for it to dry after, it will smudge if you go in too soon. I also tackled the bunny tail at this point, using the same techniques as with the rest of the body.


8. Add highlights with your fine nib white Posca pen, it's especially effective on the kraft card, as we can't leave white areas as we can normally when colouring on white card. I added highlights to his eye, nose, scarf and the trim on his hat.


All done! Hope you found this interesting and helpful.  Feedback much appreciated! What do you think of doing it via pictures? Is it helpful? Would it be more helpful if I did a video? Let me know :)


Thursday, July 13, 2017

Win Win Win!

Was soooo happy to be picked in the 300 member giveaway at Little Blue Button Stamps (Facebook Fan Group). This image - Spike n Anna Having Coffee is an awesome digi and it was really good fun to colour too. Did it straight away, couldn't resist.


Keep trying new ways to colour the hair with polychromos, not sure it was perfect but it was a way to tackle her voluminous locks! The card I used to colour on is called "Kendal Buff" and I believe you can buy it in some Hobbycraft stores.


Spike the dog was fab to colour (In polychromo pencils) , just did him in the standard hairy fashion. I usually avoid doing anything black but this time his eye patch worked out ok, tho I do seem to have made his ears look a bit like antenna, lol.


Fonts I used are East Coast Stationery and Gungsuh.  Just 3D foamed it onto a 7x5 kraft card blank and added a couple of pearls from the stash to finish.

Monday, April 04, 2016

Update!

The blog may be a bit quiet this week. I've been making lots of cards but the kind that can't be posted online straight away, so although I may appear dormant, I am infact quite busy :) I also have a large batch of wedding invites to make this week too so that also is keeping me productive.


I have been doing a spot of colouring in the evening though so thought I would share with you another of my adult colouring postcard cards ( from the Pretty Animal Postcards book ).

Coloured with Polychromo pencils and added striped washi tape :)

Wednesday, March 23, 2016

Using the adult colouring craze for cards!

I've already posted how I'm keen to make use of the "adult colouring" pictures for cards and other projects. This time I am using one of the postcards from "Pretty Animal Postcards" by Buster Books. (Designs by Felicity French, Cindy Wilde, Hannah Davies and Hannah Wood).


I lightly sketched a circle onto the design and just coloured, with polychromo pencils, inside the circle. I added a greeting, some bling, and foampadded it onto a card blank. This was for personal use, not for sale, I gave it to my Mother-in-law :)


Monday, March 14, 2016

Garden Colouring....

I've been looking for a way to use parts of colouring books in my cards, for personal use, so I can do something with the images after I have enjoyed colouring them. It also occurred to me that they'd make pretty nice backgrounds just as they were!

This background image is from The Secret Garden - Available as a free download from The Adult Coloring Club. I have drawn two birds based on an element within the "colouring image" to make a feature for the card and added diecut bunting (Die'sire) , fence and watering can (Trimcraft). Birds and fork handles coloured with copics. They are meant to be a male and female bullfinch! :)


Friday, March 04, 2016

Sneaky Lazy Purchase.

I have to confess, I always thought these were for lazy people, but no... I was completely wrong....they are for anyone who colours with pencils! Have done a fair few pictures with my polychromos recently and actually gave myself a blister from sharpening them. I am weak. :) I also gave myself a massive bruise where I hold my clip board whilst I colour in front of the tele, but that's just me being a numpty.

Anyway, I actually want a derwent one of these, but foolishly did not buy them when they were a tenner on amazon, and now they are something like £70? Which is bonkers. Anyway, trying a cheap £10 one, with reasonable reviews. It seems ok, but I don't like that it has no automatic cut-out when the nib is sharp... so may have to keep hunting for an affordable alternative.


Also, it's called a O'huhu, which makes me chuckle :)

Wednesday, September 02, 2015

Arty Impressions Cat Lady Stamps

I love this stamp set! It's actually a full set of stamps to make a triple fold card, featuring a "cat lady" and all her cats. It's the only Arty Impressions set I have and I am impressed with the attention to detail and quality of the stamps.


You could stamp them directly onto the cardstock but as I wanted to colour them with Copics ( which bleeds through to the other side) I decided to stamp them onto a nice smooth paper and then cut them out. Is that sort of cheating? :)


I've started to collect some prefered colour sets for colouring in various types of cats ( Colours of cats??) and it's handy when colouring my own digi images too. So my current Ginger Tom palette is -
Stripes - YR31, YR23, Y38, E33 and shadows in W1. Eyes in any yellow or green handy, and nose in whatever flesh/pink is to hand :)


I've decided finding other peoples cat stamps that I enjoy using is excellent research for my own enterprise. I quite like having very few details when I'm colouring the cats, but without a bit of guidance where paws or tails might be, it definitely slowed the colouring mojo! I don't like when the stripes are pre-drawn though. Do you?


 Thoroughly enjoyed the process and love the card that resulted (passing it to a friend for her birthday, not selling this one) and it's made me think how I might make some cat "scenes" to stamp in layers of my own.

Additional Birthday Greetings by Hero Arts, "Birthday Messages" CL139


Entered into Crafty Addicts Challenge 2, Spots or Stripes/Anything Goes Am hoping all these stripey and spotty cats will fit the criteria :)


Tuesday, August 04, 2015

Exciting News.

I haven't been around for a bit because I am working on a new project! I am extremely excited about it and it's in the final stages before it goes live! I shall include a sneaky peek but please stand by for more news soon! :)

Thank you to my friends for supporting me through the process! :D