Showing posts with label Making Cards Magazine. Show all posts

Tuesday, May 05, 2020

Cupcake!

Hi everyone! So much time to colour and no end of gorgeous digis from Sweet Escape Digis! Have you been to their shop to see all the lovely options? I really enjoyed colouring up this Cupcake with Cherries and Bow.


This is polychromo pencils on kraft card. Background paper from Making Cards Magazine. A few touches of white posca pen to give highlights. Bling from the stash.

(Tempted? Make sure to check in the Sweet Escape Facebook Group before you make your purchase, there's often an offer on!)

Here is the digi in the shop:


Here is my version:


I decided to add some glossy accents on the cherries after I took these pics, and might add some sprinkles later too, lol!


Fonts are Bernadette Rough and Bodoni MT Black as an outline, coloured with pencils inside. 


Thanks for joining me today! I have really enjoyed GDT'ing for Sweet Escape, hopefully some more to come soon!


Friday, February 07, 2020

Splash!

Welcome to another Dr.Digi friyay! You may remember this little walrus from an earlier 3D felt episode? Here he is, Cuddly Critters Walrus, now in pencils!


Decided to pop the digi in a bit of a splashy scene, but just so you can see which bit is the digi, here he is in the shop:


Here is my version:


Remember he is also part of the super money-saving Cuddly Critter Set!


As normal he is coloured with polychromo pencils on kraft card. I added white posca pen highlights and some stickles to the water.


Background paper from Making Cards Magazine and the font is LA Headlights BTN.


Thanks for joining me on another Dr.Digi DT day. I hope your day goes with a splash too!


Thursday, January 30, 2020

Flowery Birthday Cards

Back to the marathon catch-up-post-mageddon! I used a particularly nice flowery paper and topper set from Making Cards Magazine to create these two quick cards.


For the sentiments I used a magazine stamp set (Also from Making Cards Magazine) and Hero Arts Stamp Set - Messages with a flourish (CL738).

You can still buy the sentiment stamp set I used from the magazine, directly from their website, so I shall include a link here in case you are interested. This is not a paid promotion, lol.

Friday, January 17, 2020

Owls - freebie download from Making Cards Mag.

I really like the challenge of using a limited group of items to make a card and the freebie download packs from Making Cards Magazine are a fab way to do this! Sometimes I just feel overwhelmed by choice and ideas and it results in a lack of productivity and creativity! I always feel like reducting the stash I use makes for much more interesting cards.


I love the January download pack featuring soft watercolour owls! I paired them up with some 6x6 papers from my stash, kraft card, and two different types of bling. The one embellishment set is Shimelle Glitter Girl Collection by American Crafts and the others are adhesive wood-effects gems I think from docrafts, will check!


I decided to make a set of 4 cards using 6x6 white card blanks as the bases. This was just for convenience, I have lots of them ready to use!


Because the set doesnt come with any greetings/sentiments I printed out some round ones and banner ones on the computer using two fonts, Caneletter Script and Bernadette Rough.


Several of the 6x6 papers came from a Chalk Studio Set from My Minds Eye. I can spot at least one section from a Lawn Fawn Plaid Set and a few pieces my friend Amy sent me when I worked on her Design Team, thanks Amy!


On all of the cards I added glossy accents to the Owl's eyes (Customers always comment and like it) and I added some stickles to the centres of the flowers. The bunting I used I think is a docrafts product I got from the Range.


Thanks for joining me today, I hope you like this set of Birthday cards, they were quick to make and fun to do! If you want to check out if they are still available to download you can use the link below. Making Card Magazine has a great facebook page that alerts you to offers and freebies too.

Sunday, January 12, 2020

Snowglobe Layout Part 2

More catching up, here are two of the other designs I made using my initial snowglobe layout for Xmas cards 2019. One was a commissioned card and the other one I made for a friend.


Ingredients.
I got the Artemio stamp as a wooden backed stamp several years ago, it's a favourite. I don't know if you can still buy it, but it does seems Artemio released a clear set including him.
The Frosty Friends set was a second hand purchase, it stamps really nicely so I'm hoping it's the real deal and not a knock off. It wasn't cheap! 
  • Scalloped Background shape from the stash, coloured with distress oxides.
  • Snowglobe die - Craft Emotions called Snowglobe with Houses.
  • Papers from Making Cards Magazine. (I scanned them and have printed them back out many times since my initial freebies with purchase).
  • Fairy lights from Paperchase. They were sold as present wrapping.
  • Font is CAC Pinafore
  • Bling from stash.

Thursday, January 09, 2020

Penguins!

Catch up post again, a card I made as one of my christmas designs for 2019 using the Avery Elle - Bring on the Joy stamp set.


I love this set and enjoyed using it in my snow globe layout. (Which as later posts will show, I used with a few different stamp sets!)


I thought I would just do an ingredients list for this card, I used a lot of different things.

  • Stamps - Avery Elle Bring on the Joy. (Coloured with Copics)
  • Die cut trees from Joy called "Mery's Christmas Tree and House Border".
  • Scalloped Background shape from the stash, coloured with distress oxides.
  • Snowglobe die - Craft Emotions called Snowglobe with Houses.
  • Papers from Making Cards Magazine. (I scanned them and have printed them back out many times since my initial freebies with purchase).
  • Fairy lights from Paperchase. They were sold as present wrapping.
  • Fonts are Daquoise and Freebooter Script.
  • Bling from stash.


Friday, September 13, 2019

Hippopotamus amphibius

Hello again :) It's a Dr.Digi friday and I have brought you a rather friendly Hippo! This is one of the Cuddly Critters from Dr. Digi's House of Stamps.


I was very much in need of a "go to" get well image for Hip operations! I think it must be a sign of my age that I seem to know more and more people going for a hip op!

Here is the digistamp image in the shop:


 And here is my version:


I coloured him up with polychomos and a white posca pen. Added in a bit of scenery so he looks like he is just about taking a dip! Perhaps the water is chilly? 

I learnt lots of interesting things about hippos whilst researching them for this chap. I didn't know they had hairy ears for a start off! I like to look at some photos of the real thing to get some inspiration for textures.


The backing paper is from Making Cards Magazine and the font I have used is Candy Square BTN.

*****A friend has asked me for the colours I have used to colour the hippo, as they are now written down, I decided to add them to this post too, so this is added in an edit the day after!*****

Hippo Grey bits - Warm Grey II, III and V
Hippo Pink bits - Dark Flesh 130. Light Flesh 132. Venetian Red 190. Walnut Brown 177
Hippo Shade on grey and pink - Dark Sepia 175
Hippo Blending and Highlights - White 101
Skin details - Black 199 and Dark Sepia 175.


Thanks for joining me today, more Cuddly Critters to come! And also a special non-paper project I am working on!


Monday, August 26, 2019

Watercolour cats

Was so pleased I didn't miss this free download watercolour cat set from Making Cards Magazine. Amazing customer service, I popped them a fb message to ask if I had missed it (I had checked a few times if it was available but only found the set before, and then the set after, awful timing!) and they very kindly sent me it! 

You can get links to free download sets when you subscribe to the Making Cards Magazine Newsletter.

I loved the set of cards Pauline Bird had made with them in the July 2019 edition of the magazine, but I decided to go with yellow and black as my theme, rather than yellow and dark green, I think it worked ok! :)


I printed the cats out a little smaller than the format they came in so I could use my circle dies with them. I'd saved some layouts on pinterest  that I wanted to try out and it was a lovely excuse to use some patterned papers (Some with the watercolour cat set, some from previous freebies with Making Cards Magazine and some from the stash).


The beautiful yellow geometric pattern came with the cat set, the other three papers are from the stash. The bling is from a Toucan sticky gem set I got at the range (I used bits from it on most of the cards).


I had a few bits and bobs left over from some cards I made using Mama Elephant "Sticky Notes" And Lawn Fawn "Love You a Latte" including this sentiment, so I popped it on this card. Most of these papers came with Making Cards Magazine.


Can you tell the geometric pattern is green not black? I think I got away with it, lol! I printed a sentiment for this one, font is CAC pinafore. 


Loved how this layout came out, but defo not sure where I will add a greeting to it, so it might stay wordless!  I cropped the 7x5 card blank a little to make it a bit taller and thinner to suit the layout.

Thanks for joining me today and looking at my watercolour kitty cards. Thanks to Making Cards Mag for the fab freebie and being kind enough to send it to me when I was too foolish to find it myself, lol.


Friday, August 09, 2019

That's Tragic!

Sorry to have a bit of  UK-centric blog post today but I need to start with a question! Do any of you remember a children's TV programme from the mid 1980's called "Wizbit"? 

It featured Paul Daniels and a conically shaped alien wizard? 

The expression "That's Tragic!" coupled with a poor impression of Paul Daniels voice will forever remind me of that programme and the awful triangular bob I had at the time that prompted people to nickname me "Wizbit." Luckily I had another hair cut and the reference no longer made sense and it was dropped. But yup, sharing some childhood magical baggage with you today folks, lol.  I didn't like Paul Daniels to begin with but this was the last straw. Then he said he'd leave the UK if Labour ever came to power, they did, but he didn't. Maybe I need to let go of some of these grudges eh? ;)

Anyway, far more importantly, this is my Dr.Digi's House of Stamps DT project for today, featuring the awesome digistamp "That's Tragic!" 


He is coloured with polychromo pencils and a touch of white posca pen on kraft card. Here is the original digi -

And here is my version -


The fonts I used for the sentiment are Bernadette Rough and DK Rosy Lee. The background paper was a freebie with Making Crafts Magazine  (May 2019).


I couldn't find appropriate bling to add, I wanted some red stars but seem to have used them all up already. Also choosing such a busy background paper made matching stuff harder. So, he is plain!


Thanks for joining me today. I really do hope you day is magicial.


I would like to make this post in memory of my gorgeous bestie Holly, who passed away on Thursday 1st August 2019. She filled my life with joy and smiles and she will forever be missed. Goodbye my friend. x


Friday, March 08, 2019

Giving you penguin realness.

Hi everyone! Back to the blog for Dr.Digi friyay! :D And this time I am bringing you penguins out of season. A penguin is not just for Christmas. Here is my card using "Cuddly Critters - Penguin!"


This penguin is not only a stand-alone digi but one of the critters from the Cuddly Critters Set too! (Where you get £28's worth of digis for just £15!)


I have used three penguins and just overlaid them on my computer then added text before printing them out. Because I knew they were partially black I didn't bother with any masking.


They are coloured with polychromo pencils and some white posca pen. I colour feathers just like fur, and if you are interested I have a photo demo here on the blog.


The paper behind is from the current issue of Making Cards Magazine (Where Dr.Digi is featured with a 20% off code and there are some beautiful cards by my fellow teamie Ruth!)

Please pop to the Dr.Digi's shop to see what you could be spending your money on!


Friday, December 14, 2018

Tea-L-C

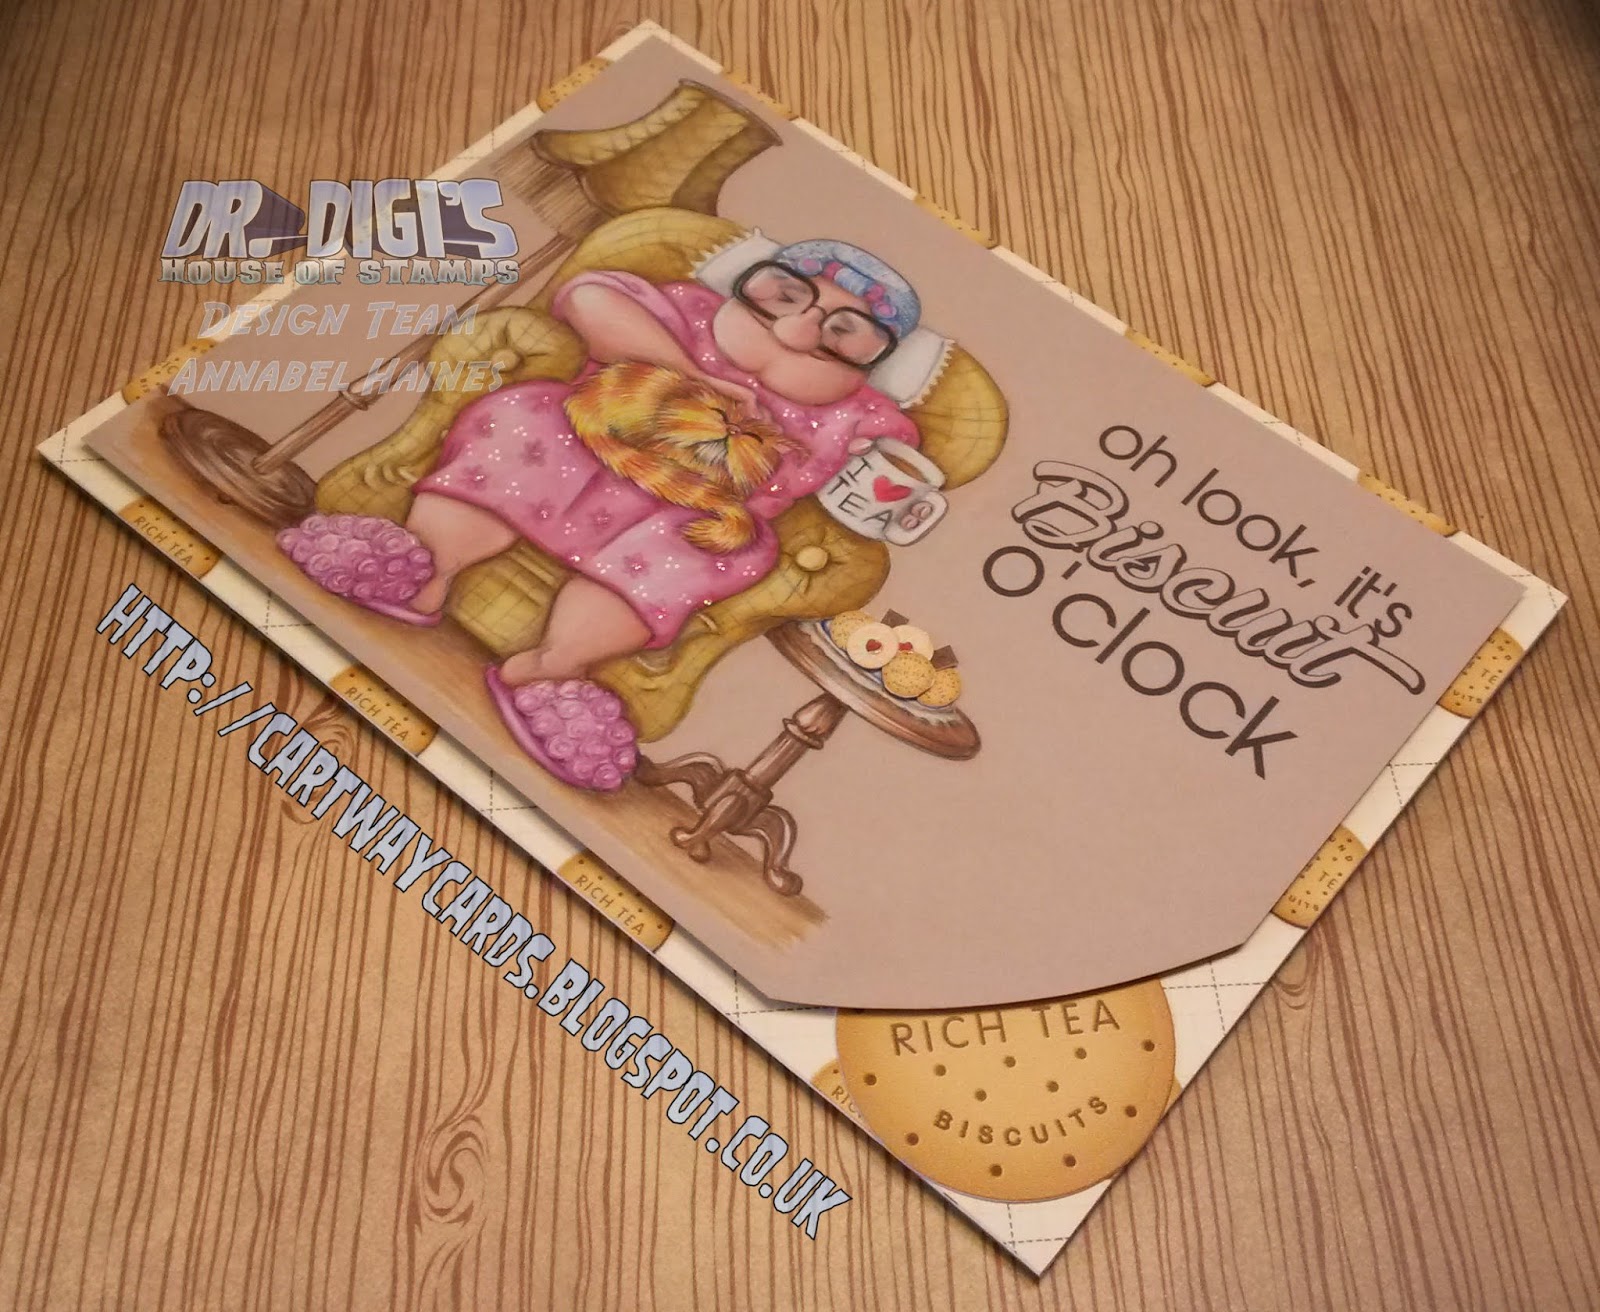
Dr.Digi's retro-friday today, I wanted to get my magazine cards blogged this year so popping in with Tea-L-C, a project I did for Making Cards Magazine earlier this year, along with Tea Trolly Dolly and Perfect Sunday.


Here she is, Tea-L-C digistamp coloured with polychromo pencils on kraft card. I also used a sentiment & biscuits from the Tea Time Sentiment Set and a backing paper from the awesome Tea & Bickies Backing Paper Set. 

If you are interested in buying any of the Dr.Digi products I have used for any of the cards I made for the magazine they are also all part of the "Tea Time Set" which is only £5, so an amazing deal, it's got 9 digis in it, as well as the papers!


Because I made her for the magazine I have some additional details including pencil selections and a recipe for making the card, so here goes!

Card Recipe.

Base
  • Create 17.5 cm x 12.5 cm card blank.
  • Print out onto white paper the Bickie – Rich Tea backing paper from the Tea and Bickies Backing Paper Set.
  • Line paper up centrally on card, adhere with double-sided tape and cover card blank. Cut off any excess.


Topper
  • On the PC make a topper image (16.5 cm x 11.5 cm) using Tea-L-C digistamp and sentiment from Tea Time Sentiments Sheet. Resize elements to fit.
  • Make digistamp paler.
  • Add an edge on the topper before printing to make it easy to cut out straight.
  • Print out topper directly onto Kraft Card. Also print on the same A4 sheet the digistamp once again, at full strength to use as a guide when you colour.


Colouring
  • Colour in Tea-L-C  digi with Faber Castell Polychromo Pencils.
  • Sketch in a warm brown floor surface for her to sit on also with Faber Castell Polychromo Pencils.
  • Add highlights using White (0.7 mm) Posca Pen.
  • Clean up any smudges and pencil dust around your image using an eraser.
  • Cut out topper. Using a curved edge to guide you, cut off one of the corners. 


Assemble
  • From the sentiments sheet print and cut out a tiny set of biscuits and one larger Rich Tea Biscuit (4.5 cm diameter). For a perfect circle use a round die to fit your large printed biscuit.
  • Stick the Rich Tea biscuit into right hand corner of card front. Check words can be seen.
  • Glue a stack of tiny biscuits to her plate and cover over the digi’s cup cake.


To Finish
  • Using 3D foam place topper onto card
  • Add Ranger Glossy Accents to glasses and jam in jammy dodgers. 
  • Add some Neon Flamingo Stickles to the pattern on her dress.

Polychromo Pencil Guide:

Skin: 101, 129, 130, 132, 177, 190, 219
Dress; 101, 129,133, 219
Slippers: 101, 129, 133
Chair: 101, 108, 109, 177, 180, 274
Cat: 101, 108, 115, 164, 190, 199, 219, 274
Wood: 101  177, 187, 190

Thanks very much for visiting today, I hope you feel inspired to do a bit of colouring! She is a smashing stamp to colour up, plenty of texture options! Now I must go and make myself a cuppa, and be very English about things :) lol.