Commission card. To fit the remit : 80th, Lady who likes the piano. The piano keys are 3D but I dunno whether its going to make it a pain to post... also because I get worried about using black card, I've made cream inserts for inside, and a panel for the back, so its now super heavy too. Doh! :)
Recipe:
Keys created by cutting a large elongated leaf shape from cream paper, then slicing out spaces for the black keys and the gaps between the white keys. Black pen used to fill in gaps where needed. Then pasted onto black paper. Stardust pen to make keys sparkle.
Purple backing paper.
Curly green corners cut and stuck.
Punched flowers, with pearl gem centres.
"80 today" printed off the computer and cuttlebugged round. Musical Clef in background.
Monday, June 29, 2009
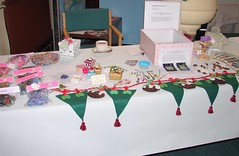
Craft Table at the Sale.
This was my main focus of effort for the Art and Crafts Sale. I made some new earrings ( most sold!) and plenty of phone charms (Always a good seller!) Sold lots of cards too.
Rachel also had some things to sell on the stall, superb felted things...I think I need to persuade her to set up an etsy shop.
Rachel also had some things to sell on the stall, superb felted things...I think I need to persuade her to set up an etsy shop.
Arts and Crafts Sale - Inside the Church
Wanted to include a couple of pics from the Art and Craft Sale last weekend! Lots of lovely paintings, quite a few I liked!
I entered my owl tiles into the auction and sold them! Wooot!
I also won the raffled picture.
It was a good day :)
I entered my owl tiles into the auction and sold them! Wooot!
I also won the raffled picture.
It was a good day :)
Happy New Home Card
So, sometimes I forget I could always just draw a card... This is all this is... tho I did cut and stick the wording on later, as I was going to do it raised, but in the end it just went on flat.
I am a bit heavy handed with my Stickles glitter at the moment ^_^
I am a bit heavy handed with my Stickles glitter at the moment ^_^
Friday, June 26, 2009
Wedding Invites
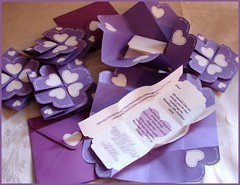
Finally got the wedding invites sorted for my friends C&D! The jacket to each invite is an origami fold, that twists as you open it to reveal the inner.
They are having a cream and purple wedding but I wasn't really given any other restrictions.
I made 57, plus a few spares incase of accidents :)
Recipe:
Origami folded square of purple paper. Small square of purple paper glued on back to reinforce the shape.
Cuttlebug cream heart in each section.(4)
Punched cream heart in each outer section. (4)
Add stitching detail to both sets of hearts.
"You are invited to..." writting, hand written around edge of card.
Inserts printed via computer, printed on cream paper.
Folded to fit the central square inside the origami jacket.
Purple stitching added to match outer card.
Cuttlebug heart with purple stitching stuck to the back of each purple envelope.
Also included were A4 map and hotel/b&b details.
Baby Card
Card for "Riley" my new almost nephew! :)
The baby is a "Jolly Nation" decoupage sheet, the patterned paper is the matching background supplied with it.
I edged the letter with blue ink and then used stickles sparkly glitter over the top, so it has the effect of blue glitter.
The baby is a "Jolly Nation" decoupage sheet, the patterned paper is the matching background supplied with it.
I edged the letter with blue ink and then used stickles sparkly glitter over the top, so it has the effect of blue glitter.
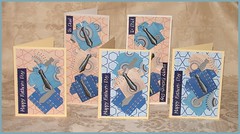
Father's Day Cards
My friend Su and I have discussed making these little shirts for ages, but never got round to actually doing it. She gave me some small silk ties she had purchased to go with the idea, so this father's day I actually got round to it.
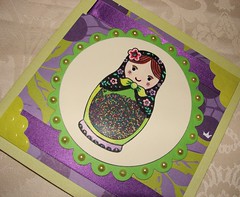
Russian Doll Shaker Card
This is my first go at a shaker card ( I think... I cant remember making one before..) and I am v.pleased with it.. I also think doing a circular version may have helped keep the little beads in!
Recipe: Hero Arts Stamp, coloured in, tummy area removed.
Cuttlebug circle shape around it.
Glue section of acetate to back of circle.
Carefully create a circle on the back with 3d foam tape. I made slits in the one side so it could be bent into the right shape.
Put accent beads into place.
Cuttlebug shape to fit behind the circle and glue behind.
Rest of card as normal.
Friday, June 05, 2009
New Baby Boy..
I am an Auntie Again! :) This is for my Mother-in-Law to send...
I made the bear myself..... I couldnt fine one the right size to stamp or cut out etc... I'm not happy with the spurting milk bit, but I needed something to fill the gap! I'd like to have another go at this card,..smooth out some of the problems! :)
I made the bear myself..... I couldnt fine one the right size to stamp or cut out etc... I'm not happy with the spurting milk bit, but I needed something to fill the gap! I'd like to have another go at this card,..smooth out some of the problems! :)
New Smirk Card
New Smirk Card finally motivated me to set up a "Smirk by Trimcraft" group on Flickr.. I am hoping to find some other people using the range...
http://www.flickr.com/groups/1138997@N23/
This was relatively quick.. Used the Smirk stamp and their paper..which is fabulous! :) "On your Birthday" was upcycled ;)
http://www.flickr.com/groups/1138997@N23/
This was relatively quick.. Used the Smirk stamp and their paper..which is fabulous! :) "On your Birthday" was upcycled ;)
Hero Arts Owl and Sqwirl
Another set of Hero Art Stamps! I loves them :) Just two little cards for the sale card box.
Just mat and layer using the cuttlebug and stamping on cream paper and colouring in with pencil crayons.
Also getting some good use out of my Sakura clear gloss pen, and the stardust pen... as well as Stickles stardust glitter glue. I would have all three in my "Craft essentials list." ^_^
Just mat and layer using the cuttlebug and stamping on cream paper and colouring in with pencil crayons.
Also getting some good use out of my Sakura clear gloss pen, and the stardust pen... as well as Stickles stardust glitter glue. I would have all three in my "Craft essentials list." ^_^
More kokeshi lovelyness...
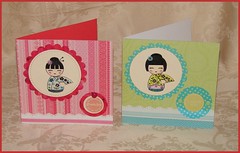
Made two more kokeshi thank you cards to go into the card sale box at coffee morning. They are having an event mid June so I have to start to stock up that box!
Recipe: Sqaure card blank. Backing paper punched with edge punch to make fancy border, or using paper with mock fancy border. Vellum cut via cuttlebug, and circles. Kokeshi dolls printed with black ink on cream paper and then coloured in with pencil crayons. Embellished with flowers in their hair and fans in their hands.
Recipe: Sqaure card blank. Backing paper punched with edge punch to make fancy border, or using paper with mock fancy border. Vellum cut via cuttlebug, and circles. Kokeshi dolls printed with black ink on cream paper and then coloured in with pencil crayons. Embellished with flowers in their hair and fans in their hands.
Subscribe to:
Comments (Atom)


