More of the thank you cards! Got this fab set of Matryoshka doll stamps from my friend Susan for my birthday. Love them! :) Hero Arts make great stamps.
Recipe: Tall Card Blank, covered with "Ripe Berry" paper, circles made by the cuttlebug. Stamp in black, using water based pens to watercolour them in. Thanks message printed out on the printer, or using one from a magazine freebie sheet. 3D foamed. :)

Wednesday, April 29, 2009

Kokeshi Thank You Cards
More thank you cards for my birthday presents. I love these kokeshi stamps from "Hero Arts".. its Clarian's Hawk's fault I had to buy them..(and a cuttlebug!)Tried to do a few different version and used water based pens to watercolour them in. Also very nice to use up some of the oriental paper I have stashed.
Recipe: Tall card blank, covered in paper. Cuttlebugged circle and scalloped circle. Kokeshi stamped onto cream paper and coloured in with watercolour pens. 3d foam layers. "Thank you" printed out on printer.

Recipe: Tall card blank, covered in paper. Cuttlebugged circle and scalloped circle. Kokeshi stamped onto cream paper and coloured in with watercolour pens. 3d foam layers. "Thank you" printed out on printer.
Noah's Ark Thank You Cards
Some of my thank you cards I made for my birthday this year. My top friend Toni bought me this fab Noah's Ark stamp from "Time to Sew" for my birthday, so I used it to make her thank you card, and also for my nephew, Arthur.
Its lush... I want to make more of them immediately. :)
Recipe: Tall Card blank, covered in "ripe berry" paper, circle and scalloped circle thanks to cuttlebug, stamped image, coloured in with brush pens. 3d foam. "Thank you" from a magazine freebie page.

Its lush... I want to make more of them immediately. :)
Recipe: Tall Card blank, covered in "ripe berry" paper, circle and scalloped circle thanks to cuttlebug, stamped image, coloured in with brush pens. 3d foam. "Thank you" from a magazine freebie page.
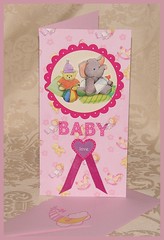
Baby Girl Card
New baby girl card, also for the coffee morning card box. I am really struggling without the printer and this would have been so easy had I just been able to print out the greeting. However it probably made for a more interesting card having to use the "BABY" stickers and the "love" sticker...
Recipe: Card blank covered in baby girl paper. Cuttlebug circle and scallop edged circle. Elephant decoupage. Baby stickers with heart gems. Love sticker, backed on pink card and 3d foam. Pink silk ribbon. White gel pen to doodle some spots.
Recipe: Card blank covered in baby girl paper. Cuttlebug circle and scallop edged circle. Elephant decoupage. Baby stickers with heart gems. Love sticker, backed on pink card and 3d foam. Pink silk ribbon. White gel pen to doodle some spots.
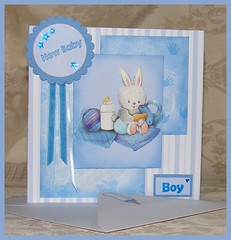
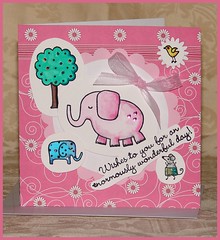
Baby Boy Card
Made this for the coffee morning card box, I always seem to sell the baby cards very quickly.
Recipe: Blue Stripey Card. Three co-ordinated piece of baby paper, chalked edges and hairsprayed to keep in place. Decoupage bunny. Cuttlebugged rosette. Stamped "New Baby and Boy" Pale Blue silk ribbon, blue velvet ribbon (from the smirk range)
Recipe: Blue Stripey Card. Three co-ordinated piece of baby paper, chalked edges and hairsprayed to keep in place. Decoupage bunny. Cuttlebugged rosette. Stamped "New Baby and Boy" Pale Blue silk ribbon, blue velvet ribbon (from the smirk range)
Three Aperture Embellishment Cards
I'm really gutted I cant find these three-window-aperture cards anymore.. I bought a few lots last time I saw them..they were on sale too, which was a bonus. Although they aren't inventive, they always sell well, and are very quick and easy to make.
This time I had some embroidered/applique to use up, so I mounted them on simple paper and vellum backing.
This time I had some embroidered/applique to use up, so I mounted them on simple paper and vellum backing.
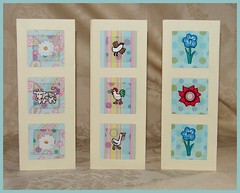
Girl Cards
Wanted to make a few cards for younger people, so these are some of the girl cards I made.
Recipe: The backing paper is from the "ripe berry" paper set. Ribbon and stamps are from Smirk. Cuttlebug for the circles etc. Would normally print out the "Happy Birthdays" but this time they are stamped.
Unfortunately I think my printer has died :(

Recipe: The backing paper is from the "ripe berry" paper set. Ribbon and stamps are from Smirk. Cuttlebug for the circles etc. Would normally print out the "Happy Birthdays" but this time they are stamped.
Unfortunately I think my printer has died :(
Thursday, April 23, 2009
Monsters
Am going through a bit of a monster phase at the moment.. have purchased two different set of monster themed crafty items... these 3d stickers were from the pound shop, and I reckon make great cards, for v.cheap indeed!
The other monster stuff I purchased from paperchase, which is my new favourite location in the world.
Recipe: Tall thin card blank, covered with spotty paper, centre strip of co-ordinating paper, Cuttlebugged circles from mirri card, stuck on monster stickers.
Inside reads ( printed on the PC) "Wishing you a Monstrously happy birthday!"
To go in the card box, for sale.
Wednesday, April 15, 2009
Crafting table..
It was my birthday this week so I am now cracking on with some thank you cards to send out. I'm using a few new stamps, kokeshi dolls and matryoshka dolls ( from my friend Su) from Hero Arts, and a very nice Noah's ark stamp which came from Time to Sow (via my friend Toni :)
Stamping in black ink on cream paper. Colouring in with Whispers Pens and water, to make a watercoloured effect.
Pictures of the finished articles to come :)
Stamping in black ink on cream paper. Colouring in with Whispers Pens and water, to make a watercoloured effect.
Pictures of the finished articles to come :)
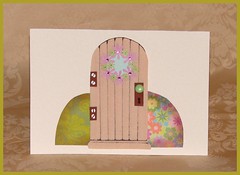
New Home Card
Quick update :) Made a couple of these, an idea from one of the craft mags. And very easy! I used blind material ( as in material you use to make blinds) for the door, then used pen to create the wooden boards... The original had brads on the hinges too, but I prefered mock screws with silver pen.
Bushes were chalked.
I dont normally like leaving blank card on show, but on this it seems to work well.
Ingredients: Card blank, blind material, punched flowers, brad, black pen, silver pen, chalk, papers.
One Commissioned, one not sold yet.
Bushes were chalked.
I dont normally like leaving blank card on show, but on this it seems to work well.
Ingredients: Card blank, blind material, punched flowers, brad, black pen, silver pen, chalk, papers.
One Commissioned, one not sold yet.
Thursday, April 09, 2009
Altered Art Book 2
This has got some lovely plates inside and I think the cover is superb, but alas..is it too nice to upcycle? Maybe... I cant find out much about this book online, this copy, with this cover, appears to be very absent...
At some point in its life it belonged to Miss Ann Elizabeth Vince of Streatham Hill. It belonged somewhere before that too, but that name is now erased.
So yes, another Altered Art book, remaining rather unaltered for the time being.
I think this one was £2, so vast frittering of money too! :)
At some point in its life it belonged to Miss Ann Elizabeth Vince of Streatham Hill. It belonged somewhere before that too, but that name is now erased.
So yes, another Altered Art book, remaining rather unaltered for the time being.
I think this one was £2, so vast frittering of money too! :)
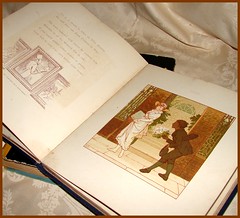
Altered Art Book 1
I am very keen to make an "Altered Art Book", the good stamping magazine had a great article showing how to make one, I get the gist, my problem is tho... every book so far that I have purchased with that intention has ended up being too nice to use!
I got this one from a Antique shop up the road from my house, it was stacked outside with the other "bargain" books.. it was £1..and has beautiful plates throughout and some poems.. each pages feels like board rather than paper.
The book is called "Monthly Maxims" by "Robert Dudley" It seems to have been given to Hugh Williams in 1899. Robert Dudley is, I think, the illustrators name, and it was published in 1890.
Theres one for sale on Amazon for £36! Gosh, anyway..perhaps their copy is in better health :)
I dont know what to do with it now!
Fantastic cheap calendars.
I found these at a nearby garden centre, 50p each.... I couldn't resist! I cant help but think each one contains 365 pictures that I can use for crafting and cards! Woot!
My parents have a black labrador so I shall definately use some of them. I also have a couple of friends with german shepherds and I bought a slightly larger diary (not pictured) to try and make them something too.
At the same time I purchased an origami calendar as I was convinced it held a certain fold that I would like to show my friend for her wedding invites..and it was about the 5th one in! :D I've been looking online for it for months and months...
I'll have to do a post about the wedding invites sometime soon, at the moment I am trying to get a post up featuring all purchases and projects... perhaps it will help me keep up with them myself? ;)
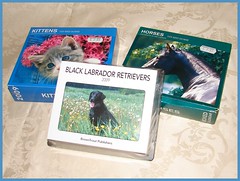
70th Commission
I'm very lucky at the moment, friends of friends are asking for commission cards and seem to have been happy to pay slightly more for them.
This one was for a 70th birthday and I used the "flower ring" idea for it. I have made this design far too much, but it is relatively simple and very effective. Punching out the leaves and flowers and then sticking them on is the only time consuming bit.
The butterfly is made by concertina'ing a shape similar to a vase (?) and then you wrap wire round the middle to hold it in place, then spread out the wings either side. I also use some of the wire to make some small curly antenna.
I might make a few diagrams/photos next time I do it!
Elephant days.
More proof of my "Hero Arts" love... I spotted my friend Su had purchased herself this set so I was sneaky and borrowed it for a bit and did some stamping!
Another bonus of these better quality stamps is that they seem not to need cleaning much, the ink goes on the paper and leaves practically nothing on the stamp!
I purchased my kokeshi set online, from ebay, free p&p £12.99. Not cheap, but I feel it was completely worth it. If you want the seller id I can pass that on no problems.
Ingredients: Card stock, 6x6 backing paper, hero arts stamps stamped onto white card and coloured in using whispers pens and water colour technique.. small pieces of bling added to each section, layered up in a decoupage way. Then some ribbon cos it just seemed a bit wonky without it :)
Status: Unsold.
Diamond Anniversary
I thought this was inspired ;) And for a change, it isnt anyone elses idea, just mine...tho I very much doubt its original! Good idea for a quick emergency card as it didnt take long!
I google image searched for the playing cards, upscaled them a little and them printed them off. I then put them onto card so I could decoupage them onto the card.
Used a 6x6 paper for the background.
Time taken : Less than 30 minutes.. which is super speedy for me! :)

I google image searched for the playing cards, upscaled them a little and them printed them off. I then put them onto card so I could decoupage them onto the card.
Used a 6x6 paper for the background.
Time taken : Less than 30 minutes.. which is super speedy for me! :)
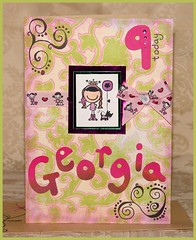
Georgia is nine
Commissioned Card for Georgia :) Purchased a few bits of the new "Smirk" range that seems to have appeared in the shops now. I like the stamps with little girls and their pets and particularly love the ribbons they have bought out to match everything.
Doodling directly onto your card seems to be a bit of a craze right now so I had a go at that too, with my sharpie pen I think.
Ingredients: A5 blank, covered in backing paper, then chalked and hairsprayed. Mat/Layered Smirk stamp (coloured in with whisper pens), Ribbon tied around card. Sharpie marker to doodle on the corners and write "today", and the "georgia" I drew, cut out and then chalked the bottom of each letter. Added some bling to "9".
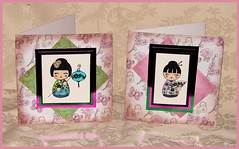
Kokeshi Doll Stamps
I am loving Hero Art Stamps at the moment... they are soo coool! They also are lovely stamps, its amazing how much difference there can be between a cheap stamp and a quality stamp. The images arre so clean and crisp.
Here are two of the Kokeshi Doll stamps I have purchases recently.
Ingredients - Two Card blanks covered in oriental backing paper made by Paper Nation. Green and Pink layering paper embossed thanks to cuttlebug, stamped images watercoloured by whispers pens and then decoupaged alittle with their fans/lanterns. Images then mounted on pink and green mirri card. Paper all aged with brown chalk and then hairsprayed in place.
Used these cards personally for birthdays.
Wednesday, April 08, 2009
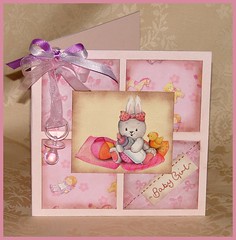
Baby Bunny number two...
Excited by the chalkingness of the previous baby card, and because I had some very cute baby girl paper, I made a pink version! Bunny is decoupaged too.. I got a really good deal (£1.99) at the QVC shop and had 30 something decoupage sheets.. not die cut tho, but I dont mind abit of cutting out infront of the tele. Scissors are relaxing :)
Ingredients: Pink card to make blank, four 6x6cm squares of cute baby paper to make square, which I then chalked with brown. ( And hair sprayed after.) Decoupaged bunny on cream paper also chalked to match. Cropodiled eyelet and ribbon. Dummy threaded on. Stitching is by pen, "Baby Girl" tab also chalked to match.
Time Taken: Quite a while.
Issues arising: Unfortunately that evening I left out all my lovely cream and ivory papers. For some reason, my neighbour decided to stir up the soot in our shared chimney and most of my crafting table got caked in soot. Lots of stuff was saved, but the creamy papers didnt make it.. I now am in much need of some more.
Soot is not my friend.
Current Card Status: Card sold straight away.
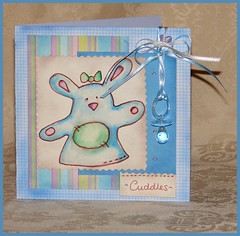
Baby Boy Bunny.
Starting my craft blog with a few cards I have made quite recently... I have a few to upload before I am up-to-date.
This is heavily robbed from one of the craft mags. I was keen to try the layout of the matting...and the chalking of the edges to get a slightly shabby blendy ness...
I was surprised how well the chalking worked..not hard at all, just used some brown for the cream paper and some blue for the other edges and the card blank ( which started out as blue gingham.)
I shamelessly copied the bunny pattern too...but it was cute and I couldnt resist.
I got the baby dummies from the "Glitter Girls" shop in Sandwell, Birmingham.
Ingredients used : Blue gingham card (to make blank), Stripey and handmade papers (to make layering), handdrawn bunny with whisper pens for watercolouring, chalks to distress/age. Eyelet with the power of Cropadile and thin ribbons threaded thru. Dummy to hang :)
This should really be a quick card, but needless to say, it took me about an hour... I work slowly, as you will come to see if you keep up with my blog :)
New Craft Blogging Mission Statement.
For a while now I have been keen to start up a craft blog, and it seems silly to start up another location when I have this one primed and ready! So, we are changing our mission statement and from here on in, posts will be of the crafty variety....maybe with an occasional digression, but not much ;)
Perhaps I shall do a little pimping of my wares, but I am not here just to sell stuff... I would like this to be a creative location for creative process and I shall be happily sharing my successes and failures and hilarious disasters with you.And thus, I shall upload some photos and get blogging :)
Perhaps I shall do a little pimping of my wares, but I am not here just to sell stuff... I would like this to be a creative location for creative process and I shall be happily sharing my successes and failures and hilarious disasters with you.And thus, I shall upload some photos and get blogging :)
Subscribe to:
Posts (Atom)