Tuesday, August 28, 2018

You are beautiful!

Had great fun working with the new "You Are Beautiful" stamp set from Witt & Sass. It's a selection of lovely flower images and kind & supportive sentiments.


  • I decided to go a bit retro and had a "case card" idea I fancied using. I had believed the original image was on Splitcoast Stampers and by a user called Advanceformore, but apparently they had cased it from this original post by Lynn Kramer-Put here. It was hard to track down as hardly any of the pinterest versions had the original link. So I took the colours and layout and adapted them to fit the You Are Beautiful Stamp Set.


All the flowers are included in the set, as is the sentiment and the zigzag lines that I stamped in repeats to make a backing paper.


All the other elements were from the stash. Diecut leaf, Black heart bling, coloured and glitter paper, ribbon.


I added some stickles to the flowers to finish. Flowers were coloured with copic pens.

This card also fits one of the Witt & Sass Challenges, you get a challenge inspo card with every order, and it can help you out with an idea or theme! I used the inspo card - Black & White, Pop of Colour and Ribbon. Remember to tag your card #wscardchallenge if you use one!


Friday, August 24, 2018

Halloween & Cats!

Back to my normal friday Dr. Digi slot and a bit more Halloween spookiness for you, this time with The WereKitty!


I love this chap and had a great time colouring him up! I also added a Dr.Digi moon behind him as he was a Were-creature, it seemed important. (I actually stole the moon from another digi, but as Dr.Digi does do a very nice moon, I shall link to it here.)


The sentiment is from the Dr.Digi's Halloween Sentiment Sheet, the purrfect match! Just used a plain grey paper from the stash for the background plus a giant purple pearl as the bling.


Really happy with his eyes and head, struggled hard to get the rest to match and I am still toying with the idea to add some whiskers! You know, when you finish a picture, it can be those final tweaks that ruin it? Yes, that!


Had fun, as normal with Dr.Digi Stamps! Here is the original in case you want to see what the stamp looks like - 


I love a bit of Halloween colouring to do, great excuse to use purple, orange and green too! Another spooky make will be coming next Dr.Digi friday!


Tuesday, August 21, 2018

Cupcake Pop Up!

Hi everyone, I'm back with some pop-up goodness and a new stamp set to show you from Witt and Sass. Here is the stamp set to start with, it's called Designer Cupcake! It's a really clever idea and super easy to use.


And I decided to stamp out six cupcakes in white ink and heat emboss the outlines. I also made a "designer" paper by heat embossing the fruit and flower toppings on a large sheet of water colour paper. Then I used my Gansai Tambi Watercolours over the top in nice vibrant colours. This is a progress shot before I got cutting things out.


I then cut out each cupcake and added a couple of the small toppings from my large sheet or background paper. I added glossy accents in part.  I then cut up the remaining backing paper to use as the matt & layering on my pop-up box card.


So I layered my backing paper on each side of the card, basically ten panels. I then used the greeting from the Designer Cupcake Stamp Set to make my circular birthday topper. I used nestabilities to cut out the circles and embellished with the couple of extra cupcake bits I had left. This is how it looks flattened out.


I really love the technology of pop up boxes! And I really enjoy how the watercolour is kinda messy whilst still being able to see the stamps through. And you may have spotted that I had to cut up my "Happy Birthday" greeting to get it that way round, but it still stamps beautifully and I can always restore the original configuration. I did feel a bit guilty though. :D Here it is from the other side.


Hope you can tell how much fun I had with this stamp set. It's nice when one stamp set can supply you with everything you need for your card!  If you would like to see what other people made with the set, don't forget to pop to the official Witt and Sass Blog this week to see what the design team have made! Click the banner below.


Monday, August 20, 2018

The final one.

Hi all! (X-post to LBBS blog) Sad post today, it's my last for Little Blue Button, and the final time I add a LBB card to my gallery. I have loved working with LBBS but I have done a year now and decided to move onto something new. :) Here is Miss Lilly and Toby again.


Think these are my fav digital pair! I coloured them both with polychromo pencils on kraft. I added a greeting in "Legrand" font and coloured that up to match.


Backing paper is Mid Summer Mornings 8x8 from Tonic. Here she is in the shop


Final picture of her, loved sticking to a red and green palette for this one.


There's lots going on a Little Blue Button at the moment and the easiest way to keep up with the news is to join the facebook group. Click here to go straight there. 


Thanks LBBS for having me :) 

Thursday, August 16, 2018

Vlad loves pumpkins!

Due to being a #badhuman I missed my Friday Dr. Digi posting slot so I'm rescheduling the post for today!

Here is the delightfully horrifying Vlad and his impressive Scary Pumpkin! Both are digistamps from Dr.Digi, as is the sentiment that I have picked from the Halloween sentiment sheet.


As normal I coloured him with polychromos on kraft. The background paper is from the Dr. Digis Skull N Bones paper set.


I added some white posca pen highlights, an extra pumpkin in the background and some spiders to the sentiment. 

Here is a close up of him and here is the actual digi. 

Loved colouring these chaps up, am happily in the mood for Halloween at the moment so expect more soon. 


If you'd like to see the other awesome Halloween images from Dr. Digis, click the logo below. 


Tuesday, August 14, 2018

Tropical Part-tay!

It's another Tuesday post for Witt and Sass and the fabulous new stamp set - Tropical Party! Featuring my favourite Witt and Sass bird, Carmen Miranda Flamingo. (CMF)


The set has five cool sentiments to pick from and loads of extra images, so I added a little pineapple chap to my wording banner.  I also used the background building stamp called grassy hill to define the outline of the grassy mound CMF is stood on. 


I coloured CMF in copic pens and some white posca pen. I added stickles and glossy accents at the end too. The background was an experiment using lace as a stencil with distress inks. I thought it looked like that sparkling-water-swimming-pool-bokeh? It probably has a proper name, but I hope you get what I mean!


When cards are very heavy, you can move them across your crafting table using tiny straw logs...just like how they built the pyramids! ;) I suppose I should now mention the MAJORLY GLITZY element of this card, the rhinestone palm tree. I know, it's a bit much, but when I saw it I couldn't resist. The dragonfly bling was in the same set.
Bling and Straws were from The Range, Background Paper was a magazine freebie.

They're quite a few of us on the Witt and Sass Design Team, people you might not already know, would you like to have a look at their blogs? I figure if you read this far, you might like something fun and inspiring to do? They are all incredibly talented bunch, I am really having to up my game!


Wednesday, August 08, 2018

Miss Lilly is being silly!

Hi again folks, (X-post to the LBBS official blog) it's the 8th of the month and my penultimate card for Little Blue Button Stamps. This time I have used Miss Lilly Silly.


As you can guess Miss Lilly is one of my favourites, so I am cramming a couple more digi stamps of Lilly in before I leave LBBS. I shall do my sad departure post with my final digi, later this month. Don't want no blubbing too early, do we? 


I coloured Lilly being silly, with polychromo pencils on kraft. I added in some extra texture on her jumper and mittens, as well as some ripped jeans too! Here is what the digistamp looks like before I coloured it.


 And my version below.


I also added a "silly" sentiment to go with her, so it's a useful card to send to my bonkers friends. This font is LA Headlights BTN.


Thanks very much for popping to the blog. There are lots of new DT members working for Little Blue Button Stamps at the moment, so it's worth checking out the blog again to see what's new. 


Using A Freebie!

Hi again! I quick post today to make sure you know there is a cool set of freebie images that perfectly match the new "Magical Creature" Stamp Set from Witt & Sass. Once you have joined the Witt and Sass Facebook Group you can find it in the Freebie Album here. I used the insanely cute little mandrake!


I made a little shelf scene using Paint Shop Pro and then coloured it with polychromo pencils. I used the font "Harry P" for my greeting.


To make a background for the mandrake topper I used distress inks and the Layered Stencil Leaves also from Witt and Sass directly onto a white 7x5 card blank.

If you are interested in the polychromo colours I used, here they are:

Pot:177, 187, 190, 101
Wood: 177, 180, 187, 199, 101 
Leaves: 108, 151, 168, 267, 101
Body: 108, 130,  177, 180, 187, 199, 101

Plus a black microfine pen and white posca pen.
I also added some glossy accents to the eyes at the end.

Thanks very much for popping in! You can see more work using the set on the Witt & Sass Official Blog here:


Tuesday, August 07, 2018

Magical Creatures!

Back here with some new things from Witt & Sass! It's very exciting to share all these new products with you, they are great fun to use, and I really hope my posts convey that! This is the new Magical Creature 4x8 Stamp Set.


I decided to make a CAS card set using the characters and sentiments from this stamp set and some other bits from the freebie digistamp set that goes with them. ( You need to join the Witt and Sass Facebook Group to see them.) 


On each 7x5 card I masked off a section and with Distress Ink and the Witt & Sass Layered Dot Stencil created a bokeh-ish coloured background.


Here the sentiments, Badgerpuff and Leodor are from the Magical Creature Set but the letters and snitch are from the freebie set! I coloured everything with copic pens and dots of White Posca Pen.


I added some stickles and glossy accents to the cards. The silver blobs on the pink card are a silver distress dauber "slammed" onto the cardstock.

Thanks for joining me today. I would also like to share with you that I am hosting the official Witt & Sass Blog now, so perhaps you would like to pop by and have a look at what's going on, sometime?


Saturday, August 04, 2018

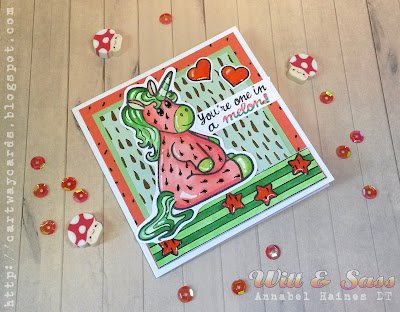
Wart-a-meh-loan Chubby!

My last project to blog using The Chubby Unicorn 4x8 Stamp Set from the Witt & Sass Stamp Company but actually, this was the first card I made! I really love the melonizing craft movement and often consider if a stamp would work well watermelon style. Also, I love it when people pronounce it wart-a-meh-lone, it makes me chuckle!


This is a tiny 10 x 10 card, sometimes it's fun to do something cute and tiny! :) I used papers from the stash, the star banner that is also part of the Chubby Unicorn set and then printed out my own greeting to go with her. She is coloured in copics and then I also added glossy accents to the seeds on her and the seeds in the stars. Hearts are also part of the set.


Really happy with how this turned out, working on this scale is really new to me, and I really enjoyed it! :) If you've seen enough of my makes using this set, and want to order your own, please click on the link below to head over to the shop!


Friday, August 03, 2018

Chubby Unicorn on a grass knoll

Hi again! It's the fourth project using the Chubby Unicorn 4x8 Stamp Set from Witt & Sass Stamp Company, and this time I also used a couple of the fab stencils you can use to build backgrounds for your feature stamps. I love messing around with stencils!


For this card I used Chubby again in a rainbow outfit, stamped in Versafine Onyx Black and coloured with copic pens. The heart details are also part of the Chubby Unicorn Set.


Then to make the background, I covered a 14x14cm square of card with (Mermaid Lagoon, Salty Ocean and Wilted Violet) distress oxides, layered the "Stencil Layered Clouds" over the top and using a wet wipe removed a layer of the ink and voilà clouds! :D
I then, on a separate piece of card, used the "Stencil BB (Background Builder) Hill" and (Cracked Pistachio, Twisted Citron) distress oxides to make a hillock. I then cut this out and layered it on top of the sky background.


Finally I added a diecut sun and rainbow ring (both nestabilities dies) and a section of flowery paper from the stash (an off-cut from one of the other unicorn cards).
I added some glossy accents to all the hearts (they look like real enamel bling with glossy accents) and some Wink of Stella to the underside of the clouds (through part of the stencil).

Interested in working with stencils? Why not check out the shop to see what is available?