Showing posts with label birthday. Show all posts

Friday, December 28, 2018

At the bus stop...

Another friday and time to introduce you to one of the characters from the Bus Stop Bunch! Dr. Digi kindly split up the original bus stop digi into individual characters for us to use! Here is the original -


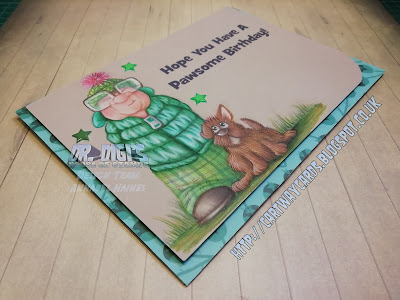
And I selected Babs, on the right, to colour today! And her little dog Baldric!


I like setting myself new challenges, so this time I wanted to have a go at a puffa jacket! 
Here is a close up of her -


And here is the digi image you can get of just her ( In know people like to compare the digi to the colour version). 


As normal she is coloured with polychromo pencils on kraft card. My kraft card stash is running very low and I am unable to find it to buy anywhere so it looks like I might have to learn to colour on something new, lol!


If you are interested in how I coloured her hat there is a photo demo of how I do knitted texture here.
I have also added a close up of Baldric and if you would like to see a demo of how I do fur, that is here!


As well as the polychromo pencils I used white posca paint pen for highlights. The stars are a recent purchase from Paperchase. The font I used for the sentiment is Grilled Cheese BTN. Background paper is from Papercrafter Magazine. I also used a 7x5 kraft card blank.

If you would like to see what else is in the Dr.Digi shop, please click the banner below. Thanks for visiting!


Friday, August 25, 2017

Free Floral Digi

This card was made using the free floral digi when you subscribe to email updates from Kit and Clowder (one of the best places for colouring classes, guidance and community).  It's a lovely image and I coloured it up with Copics and added lettering to fit the commissioned request.


Flowers are coloured with copics, there is a layer of decoupage too.  I added diecut circles to the centre (there is a circle in the centre in the original digi too, but slightly smaller). Font is Courier. Pearls from the stash and the background paper is from Tonic Mid Summer Mornings 8x8 pack.

Friday, June 23, 2017

Sneaky Hunkydory Goodness.

I really like these Pretty Pansy pot cards from Hunkydory! It's a kit, so it's kinda cheating, but it meant I had eight very quick cards suitable for ladies of a certain age. I seem to need alot of them :)


The kit has eight pansy pots, two in each colour, and I have been adding a personalised tag and greeting inside (as per the pot on the left).


They push out really well (no rips or tears) and everything fits together perfectly. (Mini review! lol). The only problem with them is they don't stand up very well, once you understand how to get them to stand straight it's fine, but until you do, it seems wonky is the only option! :)

Wednesday, June 21, 2017

A bit of a cheat....

So it's a bit of a cheat because I have made this card before, but as the customer asked for a copy, I thought it might be ok to post it again! :) I think it's been about 2 years since I made it last and luckily had kept all the choir drawings so I could use them this time too.


So it's a standard pop up box blank which I decorated with musical score and then added the choir (my own images) to the centre, so they popped up! :)

Wednesday, June 14, 2017

More Nail Art.

I think I might be a frustrated nail artist because I love making these cards! Any excuse to rustle up a new Nail Card!!

So I started with a card featuring Marvel Nail Art. (in 2015)


And then, later in the year, a set featuring "on trend" Pink Nail Art.


And this time, it's a little bit more Purple-ish Nail Art!!


So just like the other times, I used the templates I had luckily saved from the last nail card. The fold style will be more obvious in the next pictures, but I printed out two sets of fingers and layered them onto the front panels of the card. Then I used a "nail template" and painted ten designs using acrylic paint onto the mock nails. When they were dry, I curved them slightly and sprayed with clear gloss varnish. (They become really tough after that). Then I added some bling and stickles to brighten things up! Nails were added with a couple of layers of 3D tape.


Inside I mocked up a nail varnish bottle with the recipients name (blurred here) and the birthday greeting.

Friday, June 09, 2017

Baked with Love.

Been dying to use this stamp set by Lawn Fawn called "Baked With Love" (Helen got it for me for Christmas! Crafting friends are the best!). It's ridiculously cute! I saw this gorgeous card by Chari Moss and decided to use the basic layout to make a card using the same set. Being very careful to credit her on this, her work is amazeballs.


Stamps - Lawn Fawn Baked with Love
Coloured with Copics.
Papers: Lawn Fawn 6x6 Perfectly Plaid Fall.

Added: Stickles and Glossy Accents.
( A good match to this Lawn Fawn font, that I used inside the card, is CAC Pinafore.)

Mini Review!

This card also gave me the chance to use my new "Press to Impress" stamping platform from crafts-too.com. It's basically a much cheaper version of a Misti, but seems just as awesome.
Here are a couple of photos of how I used it for this card.


Placed all the elements on the section of the card that I wanted to stamp, including the clear cling stamp greeting, straight and central, where I wanted it to go.

Then I closed the lid to pick up the stamps. Inked them up in black ink and then closed the lid again to stamp the greeting! This is brilliant for so many reasons, and reduces the "is it straight" angst and the "omg a bit didnt stamp well, can stamping it perfectly over the top to fill in the gap?". I am sure other crafters must have faced that a few times! It's not just me is it?


And the result! And as you can expect, it stamped perfectly first time, and I didn't need to redo it, but if I had, it would have been easy peasy! :) I am sold on this gadget. Worth every penny. (I am not handy enough to make one from dollar/pound store products but there are plenty of people that do if you want to track down how to make one yourself!).

Tuesday, June 06, 2017

Couple of Minecraft Cards,

Just for me/my family to send to my nephew. He is VERY into Minecraft at the moment :) Both cards are pretty simple but I think he will like them :)

Creeper Card. (created my own double sided paper to use, so I could slash the middle and fold it out to reveal the pattern inside). Added sentiment in computer-style font and some papermania star bling.


TNT card. I think blowing stuff up is his favourite bit of the game. Inside it says "Hope your birthday goes with a BLAST!" I decoupaged some of the tnt's using 3D foam tape, so in real life, it has a bit of a trippy dimensional thing going on :) Layered it onto red and then some red spotty card I had in the stash.


Friday, April 28, 2017

A bit of Gaudi!

Made this card for a friend who has recently been holidaying in Barcelona! Went with a Gaudi theme, and Rivanna NF Font!


I added black nail head bling from the stash and a coat of Nuvo Crystal Drops to the text. Images all from Google image search. Less stress about image copyrights when a card is just for personal use! #cardmakersangst.

Monday, March 27, 2017

Bunch of Birds

I felt really sad that A Day for Daisies and Sami Stamps have stopped sponsoring challenges. They have beautiful images and they are a pleasure to colour. I decided to buy the one I was hoping for for the next challenge, called Bunch of Birds. I made two layouts with it, one for a commissioned birthday card and one for a Mother's Day card.


They are coloured with, as normal, polychromo pencils on Kendal Buff Card.


Font is East Coast Stationery. Background papers from stash. Glossy Accents and Bling to finish.

Wednesday, March 22, 2017

Cinderella :D

Really enjoyed making this commissioned card using "Frame-it Cinderella" by Bugaboo stamps. It's polychromos on kraft card and then some simple matting and layering in pinks. There are a lot of very old stash items used up in this, paper sets I have really loved and now have almost used up! :) Flowers are from Wild Orchid.


Friday, December 23, 2016

More little pugs!

Another Pug card made for the family with pugs and frenchies :) I saw this pug postcard and reserved it for the next time I needed to whip up a pug project! :)
I got some "Everycraftsapound" blank stepper cards and thought this would be a nice way to make the card more special.


Diecuts: Joy Clouds, Spellbinders Circles, Scallop Circles and Cattails and Sue Wilson Maidenhead Ferns,
Flowers: Wild Orchid.
Papers, Bling, Numbers and ribbon from stash.

Friday, December 02, 2016

Pop-up Box - Fifties Baking Styley

Really enjoyed making this commission! I had to feature baking and decided to go with a fifties style theme.


Pop up box template is from Everycraftsapound, really handy to have around, save a lot of time. I downloaded lots of the  free images/vintage advertising from the web and the papers are mainly from Papermania Happy Days set.

I finally got to use a magazine freebie pack of chipboard embellishments called "Nana Loves" by Jennifer Ellory - lots of great bright kitschy elements.

Font is Blessed Day.

Close up of the card.

Wednesday, November 30, 2016

Pickles and Jams

Two commission cards today, same kind of layout with an extra tweak :) One was for a keen pickler, and the other a keen baker!


These are two layers, like standard shaker cards, with a layer of perspex between the topper and the base, and the contents (in most of the jars) can move about. I put sequins in the jam pots, and cut out some mini veg shapes for the pickles. I need some thicker foam for shaker cards, the sequins don't move as much as I'd like! :)

All the images were free clipart.

The font is Angel Tears.

Monday, November 28, 2016

Poppy baking.

Commissioned card for a friend, based on a photo of the birthday girl (She'll be nine!) baking.


Hand drawn image coloured with distress inks used as watercolours.  Utensils and Chocolate are from Personal Impressions (I've never had a card before that I wanted to use them on, so they are rather longterm stash items). Font is "Angel Tears."

Wednesday, October 19, 2016

Love these new Grace Taylor Papers!


Commissioned card I made back in June for a friend. The recipient loves German Shepherds, so I had to include one. I love these new papers by Grace Taylor ( Home Sweet Home, 100 Sheet Paper Kit, 12x12) that I got recently from a fair.

Completely straight forward easel card with matting and layering and Wild Orchid flowers. Font is Apple Butter.

Ribbon, dies, foam tape etc all from crafty stash.

Friday, October 14, 2016

Pair of black, red and white kitty cards.

This started as a commissioned card for a 60th birthday, but I eventually made a pair of cards using two backgrounds I had created to compliment the image and colour scheme.


The central image is using an Inkylicious  stamp called "Cat - Toby".. which I picked up in a Craft Fair some time ago and had not used before. I really like it! And I was able to edit it to use as a black and white cat and as a black cat for the commissioned card. The butterfly stamp came with the image and I used a grass stencil to give the cat a base to sit on.


The two backgrounds were made by first blowing (distress reinker) inks with a straw! I love the look of it, and discovered if you blow really hard, you can make quite a thin network of veins! On the one version I then used normal distress inks to colour the cardstock, and on the other left it white.

Distress Ink Base layer - Ripe Persimmon, Barn Door, Spiced Marmalade and Fired Brick
Reinkers - Mustard Seed, Carved Pumpkin and Candied Apple.

Stamps in background, using Versafine Onyx Black  - La Chat Noir from Craft Stamper Magazine, "We Love Cats" from the Apple Blossom Craft Collection and Poppy Paint Fusion Set from Sheena Douglass.

Glossy Accent on eyes, bling and ribbon from stash to finish.

I scanned and reused the backgrounds so I could  make matching inners for the cards.


Monday, October 10, 2016

Aladdin Sane.

Commissioned 21st Birthday Card in the style of a David Bowie LP. Fun brief! I loved making this in the end, though in my brain it seems more complicated than it was in actuality. I could do with some larger round dies, but a tin lid turned out to be exactly 5 inches so, win! :)


So I chose the iconic Aladdin Sane Album, I think it must be the most famous image of Bowie? Her name is Abbie and I was soooo tempted to rename the album "AbbieIn Sane" but I thought that might be too rude! lol. (With a commission you have to be rather more polite, don't you think?)

The Album cover is just a sleeve, like a real LP Cover and then the card slots inside. Here is the card stood up, it's a normal tent fold, but round!


I layered up lots of black circles, and made them shine with a touch of glossy accents. I downloaded the red centre disc for the album and just converted it. The centre is foam mounted/raised and the 21 is a void. I layered sparkly paper behind it to show through the "21".

I love this image from the album shoot (found whilst I was trawling google) and decided to make it the new back cover album art.


Friday, September 30, 2016

Camel Land Rover

Commission card for a friend, combining a Camel Landrover with being a builder :) I went with a colour theme and then chose elements to fit in! 

Background paper made with (google-image) building plans layered (via PSP) onto a white background and printed out. Then I coloured it with distress inks and flicked water droplets on it. Glossy accented the windows in the Landrover to finish off.


The Font for the sentiment is "Coffin Nails". Read more about the Camel Trophy here.

Friday, September 23, 2016

Card for my BIL

Did a little watercolour picture from a photo of my nephew Riley and thought I would convert it into a birthday card for my brother-in-law (his Dad!). It was actually quite hard work making a card and leaving it so the painting could be removed if they wanted to keep it! (That's if they recognise it's meant to be him, lol!).


Close up of the watercolour.


Set of paper were from "Making Cards" magazine, a long time ago, but they've been a really useful boy set! Stars from Prima and Papermania. Font is "Breamcatcher" one of my fav fonts.

Friday, September 16, 2016

Guild Wars 2

Another commission card today, and this time the theme was "Guild Wars 2", which if like me, you are not down with the kids, you might need to know is an on line role playing game :) Because I don't know much about it, I went with a safe option, to use the dragon image that is in the games logo.


I digitally traced/contoured the image and then added text to the file. I printed it out onto hammered cardstock (looks like watercolour paper) and then used distress inks like watercolours to fill in the dragon shape. I added red enamel bling and then 3D foam mounted it onto a 6x6 blank card.